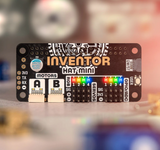
A versatile motor, servo and audio driver HAT for Raspberry Pi. Bring your mechanical inventions, creations and contraptions to life!
Free shipping on this item!!!
Features
- Nuvoton microcontroller (MS51TC0AE) with built-in 16-bit PWM and 12-bit Analog to Digital Converter (datasheet)
- 4 sets of header pins for connecting 3 pin hobby servos
- 4 sets of header pins for GPIO (all of which are ADC capable)
- Servo and GPIO pins all have their own power and ground pins
- Dual H-Bridge motor driver (DRV8833)
- 2 JST-SH connectors (6 pin) for attaching motors with encoders
- Alternate socket connector for attaching 2 standard (2 pin) motors
- Per motor current limiting (425mA)
- Per motor direction indicator LEDs
- MAX98357 3.2W I2S mono amplifier
- 2 pin (Picoblade-compatible) connector for attaching speaker
- 8 x addressable RGB LEDs/Neopixels
- User button
- Qw/ST connector for attaching breakouts
- Pass-through 40 pin header
- Fully assembled - no soldering required
-
Python library
- Schematic
Inventor HAT Mini is compatible with all Raspberry Pi computers with a 40 pin header attached. Mini HATs fit especially neatly on top of Raspberry Pi Zero boards, though.
Raspberry Pi, motors, servos and speakers are sold separately.
Connecting Breakouts
The Qw/ST connector makes it super easy to connect up Qwiic or STEMMA QT breakouts. If your breakout has a QW/ST connector on board, you can plug it straight in with a JST-SH to JST-SH cable.
Breakout Garden breakouts that don't have a Qw/ST connector can be connected using a JST-SH to JST-SH cable plus a Qw/ST to Breakout Garden adaptor. Want to use multiple Qw/ST breakouts at the same time? Try this adaptor!
Notes
- Measurements: 65mm x 30.5mm x 15.5mm (L x W x H, approx).
- Inventor HAT Mini has some extra broken out headers that adventurous roboticists might find useful (note that these are unpopulated and so will require soldering):
- 1 set of headers for connecting a serial device, or an 3.3V ultrasonic distance sensor
- Unpopulated terminals for supplying external power via a screw terminal block (10A max)
- 1 set of headers for connecting a serial device, or an 3.3V ultrasonic distance sensor
- External 5V power can be used to power your Pi and all the functions on the HAT (instead of the Pi's USB input). On an unmodified board you should only have one power source connected at a time, to avoid back-powering the second PSU.
- Alternatively, you can provide your motors and servos with a separate power supply from that used to power the Pi (input voltage 2.7V to 10V). To do this you'll need to cut the trace on the back of the HAT that is labelled with a lightning bolt. This will prevent the Pi being damaged by the increased voltage.
- The direction indicators for each motor can be disabled by cutting the traces on the back labelled with LED symbols, next to the motor connectors.


